Dashboard #1 - Basics [ Script]
This is the first formal training video of ClassroomAPP. The goal is get teachers comfortable with the basic features of the dashboard
We strongly recommend you move onto the next video right after, once the concepts have sunk in
Video (6 mins)
Related Videos
Script
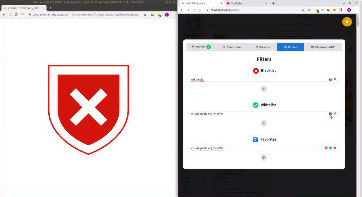
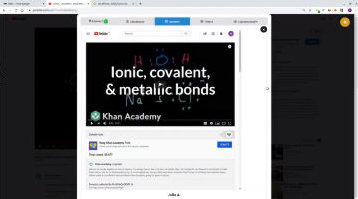
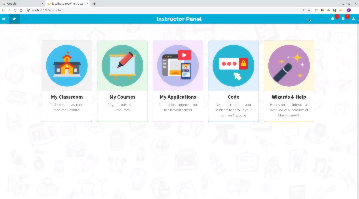
Hello and welcome to this first of two dashboard videos.

In this video we cover the basics. We recommend you watch the second video right after.
It will take you through more advanced use cases of your classroom dashboard.

To show you the interaction between teacher and students, we split the screen in two.
On the right we have the teacher. And on the left we have a student.

As a teacher I first loggin to my device, then click on the ClassroomAPP icon.

Then I click on the course to connect.

Right away, I am connected to my classroom. You can see connection messages for both teacher and student.

Now turn your attention to the icon.

On the teacher side, I see that I'm connected to a single student.
You would typically have more students, and that number would be higher.

On the student side, I have a green checkmark, which tells me I'm connected to my teacher.

Okay, so let's go ahead and start teaching.

I go to my classroom panel,
and I can see that this student is on wikipedia.

This classroom panel gives me a real-time view of what's happening in my classroom.

If the student goes inactive for a long time, I get this red warning.

This would appear after a minute and a half of inactivity.

If I move over to the student side, watch what happens as soon as I start working.
The warning disappears.

This gives you a quick view of who in the classroom is inactive.
Very useful to tell you who's off task or chatting.

The classroom panel has a number of key features.

First, the force feature.

Force allows me to send students over to a specific webpage.
This is typically a starting page of an activity.

When I click on the dropdown, I get a list of my most recent websites.
I'll choose my YouTube video, and will force students onto that video.

Force sends them to the resource, but then they're free to do what they want afterwards.
And that's the purpose of the force. It's a starting point, not a lock.

If you want students to stay in a specific place, you would use the lock feature.

Let's go ahead and lock students into the youtube video.

You see right away the student goes full screen. If a student tries to leave the locked page, ClassroomAPP takes them back.
They can't leave.

Notice how the student has a red checkmark in the ClassroomAPP icon.

It means they're locked into this page.

If I unlock them, it turns back to green.

The individual lock or force is meant for releasing or locking specific students.
The global controls, however, are for the whole classroom.

Let's say the whole classroom is in a test or a classroom activity, and you locked everyone.

and one student is done.

You can unlock them so they can work on something else.

And you can force them onto a specific page if desired.

I could of course, use individual lock too.

The volume control.

This is meant as a way for you to lower the noise level in the classroom,
when students are watching videos or are in activities with audio.

Time for the screens panel. This panel allows you to view all student screens at a glance.

You can also zoom in on an individual screen to see more detail. And you can click on a student's screen for them.

An important consideration is that the screens refresh every 5 seconds.

Imagine you had 30 students per classroom streaming their screens.
This would slow down the school network dramatically.

So we interleave the screen views to update one screen at a time.
Within half a minute you'd have a full refresh of all screens.

Now onto the last panel, the filters.

You have two main kinds of filters, and this is unique to ClassroomAPP.
Other systems would either have one or the other.

You have a black list, which means you're blocking sites. Or a white list which are the sites you allow.
With ClassroomAPP you can block a whole category of websites, but only allow the ones you want.

Let's say I don't want them to go anywhere, so I put a star here, which is a wildcard.

But I'm only allowing Wikipedia, for example.

If they try to go to YouTube, it will get blocked.

But if they open a new Wikipedia page, it would allow them.

Favorites is where you'd store commonly used pages.
It could come in quite handy if you use similar resources quite often.

Then you would save your resources here. Let's say I'm allowing them to go to the BBC.

To show this, I’ll add it to my favorites

Then just click on the green allow button and it gets copied over to the white list.

This video covered the basics of the ClassroomAPP dashboard.

You now have what you need to start using it in the classroom.
You know how to view student screens, how to view where students are. How to force or lock pages,
and you also know how to filter web pages in real-time.

In the next video, we'll cover the more advanced use cases.
Which will certainly come in very handy, as you start using your dashboard in your classroom.

Thank you so much for watching. We hope it was as fun as it was useful.